


![Install Ansible on Ubuntu [20.04]](https://onloadcode.com/wp-content/uploads/2020/12/Install-Ansible-on-Ubuntu-20.04-1-800x450.png)
This article demonstrates How to Install and Configure Ansible on Ubuntu 20.04
Ansible is the simplest way to automate apps and IT infrastructure. Its open-source software provisioning, configuration management, and application-deployment tool enabling infrastructure as code. It runs on many Unix-like systems and can configure both Unix-like systems as well as Microsoft Windows.
In this article, we are going to install ansible on Ubuntu 20.04 and use it to connect to some other VMS.
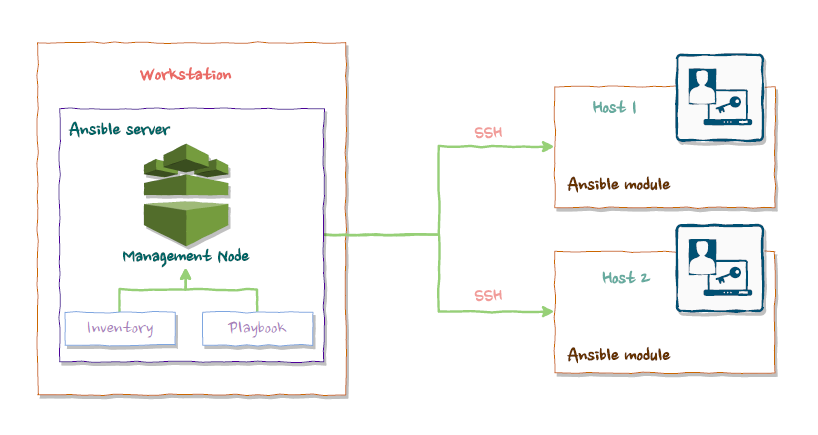
Ansible architecture
Ansible works by connecting to your nodes and pushing out scripts called “Ansible modules” to them. Most modules accept parameters that describe the desired state of the system. Ansible then executes these modules (over SSH by default), and removes them when finished.
Prerequisites – Prepare Ubuntu 20.04
Workstation node to implement Ansible Management Node
- A non-root user with sudo privileges.
Create and Delete Sudo User on Ubuntu [20.04]
- SSH key pair associated with the user
Generating and Working with SSH Keys on Ubuntu [20.04]
One or more host nodes
- SSH access from workstations. For this need to set up the SSH key pair in the above step.
Installing Ansible
First, we add an ansible repository to apt and we install ansible using API.
sudo apt-add-repository ppa:ansible/ansible
sudo apt update
sudo apt install ansible
now we already install ansible on our workstation. This will work as a management node.
In the next step, we have to add our remote servers to the inventory file to access and control them using ansible.
Add remote host to Inventory File
We have to add remote servers to the ansible host file. This is located at /etc/ansiblehosts
sudo vim /etc/ansible/hosts
Here we can add servers defining as groups. In this example, I have added two groups master and workers. Master group having 1 server and the workers group having 3 servers.
[masters]
master ansible_host=host_ip_1 ansible_user=ansibleuser

[workers]
worker1 ansible_host=host_ip_2 ansible_user=ansibleuser
worker2 ansible_host=host_ip_3 ansible_user=ansibleuser
worker3 ansible_host=host_ip_4 ansible_user=ansibleuser

[all:vars]
ansible_python_interpreter=/usr/bin/python3
Replace the host_ip_x with the IP addresses of your Ansible hosts. And ansibleuser With your ansible user
Let’s check the inventory list
ansible-inventory --list -y
Output will be
all:
  children:
    masters:
      hosts:
        master:
          ansible_host: host_ip_1
          ansible_python_interpreter: /usr/bin/python3
          ansible_user: ansibleuser
    ungrouped: {}
    workers:
      hosts:
        worker1:
          ansible_host: host_ip_2
          ansible_python_interpreter: /usr/bin/python3
          ansible_user: ansibleuser
        worker2:
          ansible_host: host_ip_3
          ansible_python_interpreter: /usr/bin/python3
          ansible_user: ansibleuser
        worker3:
          ansible_host: host_ip_4
          ansible_python_interpreter: /usr/bin/python3
          ansible_user: ansibleuser
We set up the ansible management controller in our workstation now. Now we can connect to the ansible host from this workstation,
Test connection
To test the connection to remote hosts via ansible we can use the ping module to run the command on ansible. This is one of Ansible’s built-in modules.
ansible all -m ping -u root
You should get output similar to this:
worker3 | SUCCESS => {
    "changed": false,
    "ping": "pong"
}
worker1 | SUCCESS => {
    "changed": false,
    "ping": "pong"
}
worker2 | SUCCESS => {
    "changed": false,
    "ping": "pong"
}
master | SUCCESS => {
    "changed": false,
    "ping": "pong"
}
For the first time, we try to connect to the server via ansible it will be asked to confirm the authenticity of the hosts you’re connecting to via Ansible. Type yes enter
![Generating and Working with SSH Keys on Ubuntu [20.04]](https://onloadcode.com/wp-content/uploads/2020/12/Generating-and-Working-with-SSH-Keys-on-Ubuntu-20.04-100x100.png)
![Install Helm3 on Ubuntu [20.04]](https://onloadcode.com/wp-content/uploads/2020/12/Install-Helm3-on-Ubuntu-20.04-100x100.png)

![Create and Delete Sudo User on Ubuntu [20.04]](https://onloadcode.com/wp-content/uploads/2020/11/Create-and-Delete-Sudo-User-on-Ubuntu-20.04-4-400x225.png)