


This article demonstrates how to set up a Distributed Kubernetes cluster using kubeadm on Ubuntu 20.04
Introduction
Kubernetes is an open-source container-orchestration system for automating computer application deployment, scaling, and management. It was originally designed by Google and is now maintained by the Cloud Native Computing Foundation.
In this section, we are going to implement the Kubernetes cluster Using Kubeadm.
kubeadm is a tool built to provide best-practice “fast paths” for creating Kubernetes clusters. It performs the actions necessary to get a minimum viable, secure cluster up and running in a user-friendly way. Kubeadm’s scope is limited to the local node filesystem and the Kubernetes API, and it is intended to be a composable building block of higher-level tools.
Kubernetes cluster Architecture
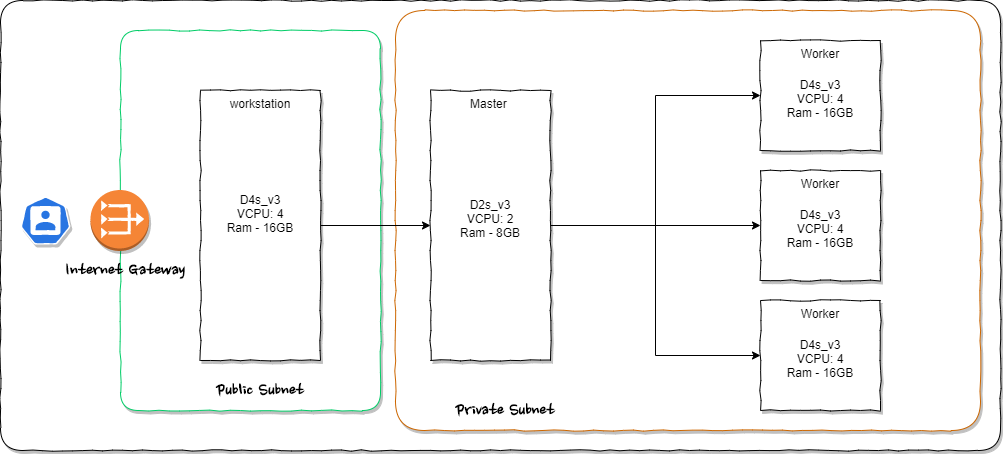
In this article, we are going to implement One Master nod and three worker node.
One master node
The Kubernetes cluster master runs the Kubernetes control plane processes, including the Kubernetes API server, scheduler, and core resource controllers…
The following master components are required on a Kubernetes cluster:
- kube-apiserver
The master component that exposes the Kubernetes API for all operations.
The master is the unified endpoint for the cluster. All interactions with the cluster are done through the Kubernetes API calls, and the master runs the Kubernetes API server process to handle those requests. The cluster master’s API server process is the hub of all communication for the cluster. The internal cluster processes, such as the cluster nodes, system and components, and application controllers act as clients of the API server.
- kube-scheduler
Assigns pods to nodes. It also finds free nodes for any workloads before scheduling workloads to the node.
- kube-controller-manager
Manages the cluster and interacts with the various APIs in the kube-apiserver.
Three worker nodes
The worker node contains kubelet and kube-proxy that both connect to the pods within the docker. Informatica processes along with different OS images that run on the worker node.
The following node components are needed on a Kubernetes cluster and can also run on the master node:
- kubelet
A kubelet takes information from the master node and ensures that any pods assigned to it are running and configured in the desired state. All Kubernetes nodes must have a kubelet. The kubelet creates a pod, makes it container ready, and performs a readiness check.
- kube-proxy
Watches on all services and maintains the network configuration across all elements of the cluster.
- Container runtime
The engine that runs the containers. Containers at runtime such as Docker or RKT are based on the setup configured.
Workstations VM
Workstation use to access Kubernetes cluster using kubectl commands and expose all the Kubernetes APIs and services via Nginx Proxy to the public.
Infrastructure details
I’m using 4 Asure VMs. This is the same as bare mettle implementation. The only thing that needs to consider is all the master and worker VMs need to be in the same virtual network. And that needs to be private.
| Server Name | Details |
| Master Node | D2s_v3 VCPU: 2 Ram – 8GB |
| Worker Node 1 | D4s_v3 VCPU: 4 Ram – 16GB |
| Worker Node 2 | D4s_v3 VCPU: 4 Ram – 16GB |
| Worker Node 3 | D4s_v3 VCPU: 4 Ram – 16GB |
Pre Requirements
We need to be sure we have access vis SSH from our workstations to other (master and worker) 4 VMs. and we need to sure all remote VMS can ass via ansible. please refer below articles if you need to setup.
Create and Delete Sudo User on Ubuntu [20.04]
Generating and Working with SSH Keys on Ubuntu [20.04]
Install Ansible on Ubuntu 20.04
Step 1 — Prepare Workstation
As mention in the Prerequisites section, we have to ensure ssh access for all mater and worker nodes from our workstation and configure ansible to run ansible-playbook scripts.
First, we Setting Up the Inventory File
To edit the contents of your default Ansible inventory, open the /etc/ansible/hosts file using your text editor of choice, on your Ansible Control Node:
sudo vim /etc/ansible/hosts
The following example defines a group named [servers] with three different servers in it, each identified by a custom alias: master, worker1, worker2, and worker3. Be sure to replace the highlighted IPs with the IP addresses of your Ansible hosts.
[masters]
master ansible_host=master_ip ansible_user=k8sadmin

[workers]
worker1 ansible_host=worker1_ip ansible_user=k8sadmin
worker2 ansible_host=worker2_ip ansible_user=k8sadmin
worker3 ansible_host=worker3_ip ansible_user=k8sadmin

[all:vars]
ansible_python_interpreter=/usr/bin/python3
Replace master_ip and worker_ips with your ips.
Now we already setup the ansible hosts. Next, we will create the user in all VMs.
Step 2 — Creating a User with sudo privileges on All Remote Servers
Create a folder as a workspace and we are going to create all ansible scripts inside that older. After creating the folder we have to create a file named create-user.yml in the workspace:
mkdir ~/workspace
cd ~/workspace
vim create-user.yml
Next, we have to create an ansible playscript to create sudo privileged user in all Master and Workers Hosts.
- hosts: all
  become: yes
  tasks:
    - name: create user - kubeuser
      user: name= kubeuser append=yes state=present createhome=yes shell=/bin/bash

    - name: allow user kubeuser to have passwordless sudo
      lineinfile:
        dest: /etc/sudoers
        line: ' kubeuser ALL=(ALL) NOPASSWD: ALL'
        validate: 'visudo -cf %s'

    - name: set up authorized keys for the kubeuser user
      authorized_key: user= kubeuser key="{{item}}"
      with_file:
        - ~/.ssh/id_rsa.pub
Next, execute the playbook by locally running:
ansible-playbook -i hosts create-user.yml
Step 3 — Installing Kubernetes on All Remote Servers
In this step, we are going to install
All servers –
- Docker,
- Transport
- HTTPS, Kubernetes,
- kubelet, 1.19.3-00
- kubeadm, 1.19.3-00
Only in Master node –
- kubectl 1.19.3-00
Create a file named install-k8s.yml in the workspace:
vim install-k8s.yml
Let’s add play script to the yml file we created:
- hosts: all
  become: yes
  tasks:
   - name: install on server - Docker
     apt:
       name: docker.io
       state: present
       update_cache: true

   - name: install on server - APT Transport HTTPS
     apt:
       name: apt-transport-https
       state: present

   - name: add Kubernetes apt-key
     apt_key:
       url: https://packages.cloud.google.com/apt/doc/apt-key.gpg
       state: present

   - name: add Kubernetes' APT repository
     apt_repository:
      repo: deb https://apt.kubernetes.io/ kubernetes-xenial main
      state: present
      filename: 'kubernetes'

   - name: install on server - kubelet
     apt:
       name: kubelet=1.19.3-00
       state: present
       update_cache: true

   - name: install on server - kubeadm
     apt:
       name: kubeadm=1.19.3-00
       state: present

- hosts: master
  become: yes
  tasks:
   - name: install on server - kubectl
     apt:
       name: kubectl=1.19.3-00
       state: present
       force: yes
Next, execute the created playbook:
ansible-playbook -i hosts install-k8s.yml
Step 4 — Configure the Master Node on the Kubernetes cluster
Here we are going to configure the master node. We will give access t config file and going to implement Kubernetes network policies using Flannel,
Create an Ansible playbook named config-master.yml on your local machine:
vim config-master.yml
Add the following play to the file to initialize the cluster and install Flannel:
- hosts: master
become: yes
tasks:
- name: initialize the cluster
shell: kubeadm init --pod-network-cidr=10.244.0.0/16 >> cluster_initialized.txt
args:
chdir: $HOME
creates: cluster_initialized.txt

- name: create .kube directory
become: yes
become_user: kubeuser
file:
path: $HOME/.kube
state: directory
mode: 0755

- name: copy admin.conf to user's kube config
copy:
src: /etc/kubernetes/admin.conf
dest: /home/ kubeuser/.kube/config
remote_src: yes
owner: kubeuser

- name: install FPod network
become: yes
become_user: kubeuser
shell: kubectl apply -f https://raw.githubusercontent.com/coreos/flannel/master/Documentation/kube-flannel.yml >> pod_network_setup.txt
args:
chdir: $HOME
creates: pod_network_setup.txt
Execute the playbook locally by running:
ansible-playbook -i hosts config-master.yml
To check the status of the master node, SSH into it with the following command:
ssh kubeuser@MASTER_IP
Once inside the master node, execute:
kubectl get nodes
You will now see the following output:
Output
NAME      STATUS    ROLES     AGE       VERSION
master    Ready     master    1d        v1.14.0
The output states that the master node has completed all initialization tasks and is in a Ready state from which it can start accepting worker nodes and executing tasks sent to the API Server. You can now add the workers from your local machine.
Step 5 — Configure the Worker Nodes
Now we have to join all worker nods with our master node. Navigate back to your workspace and create a playbook named config-workers.yml:
vim config-workers.yml
Add the following text to the file to add the workers to the cluster:
- hosts: master
become: yes
gather_facts: false
tasks:
- name: get join command
shell: kubeadm token create --print-join-command
register: join_command_raw

- name: set join command
set_fact:
join_command: "{{ join_command_raw.stdout_lines[0] }}"


- hosts: workers
become: yes
tasks:
- name: join cluster
shell: "{{ hostvars['master'].join_command }} >> node_joined.txt"
args:
chdir: $HOME
creates: node_joined.txt
Execute the playbook locally by running:
ansible-playbook -i hosts config-workers.yml
Step 6 — Verifying the Cluster
To check the status of the master node, SSH into it with the following command:
ssh kubeuser@MASTER_IP
Once inside the master node, execute:
kubectl get nodes
You will now see the following output:
Output
NAME      STATUS    ROLES     AGE       VERSION
master    Ready     master    1d        v1.14.0
worker1   Ready     <none>    1d        v1.14.0
worker2   Ready     <none>    1d        v1.14.0
worker3   Ready     <none>    1d        v1.14.0
If all of your nodes have the value Ready for STATUS, it means that they’re part of the cluster and ready to run workloads
Conclusion
Thanks for reading Create Distributed Kubernetes cluster using kubeadm on Ubuntu 20.04
You can find source codes for this tutorial from our Github.
![Install Helm3 on Ubuntu [20.04]](https://onloadcode.com/wp-content/uploads/2020/12/Install-Helm3-on-Ubuntu-20.04-100x100.png)

![Create and Delete Sudo User on Ubuntu [20.04]](https://onloadcode.com/wp-content/uploads/2020/11/Create-and-Delete-Sudo-User-on-Ubuntu-20.04-4-400x225.png)
![Generating and Working with SSH Keys on Ubuntu [20.04]](https://onloadcode.com/wp-content/uploads/2020/12/Generating-and-Working-with-SSH-Keys-on-Ubuntu-20.04-400x225.png)
![Install Ansible on Ubuntu [20.04]](https://onloadcode.com/wp-content/uploads/2020/12/Install-Ansible-on-Ubuntu-20.04-1-400x225.png)